A phone terminal is a SIP phone connected to our voice servers across the Internet.
By default, after filling in the extension's basic information , you can start setting up the options specific to the type of extension you've chosen. If you don't want to finalise the process now, you can skip this step and come back any time. Just click the Phone Terminal Setup icon available in the extension's management page.
If you need to automatically configure SIP devices associated with a Phone Terminal extension, the Set Up Provisioning and SIP section offers a detailed description of the process. In the sections below, you'll find detailed information about extension options that you can configure according to your needs.
Create a Phone Terminal (Voice) Extension
To create a voice extension, do the following:
Log into the ezy tel control panel and click Add Extension
Let the system automatically assign an extension number, or set your own to suit your needs. Using 000 is disallowed for obvious reasons.
Fill in all of the required fields, being sure to add your email address, otherwise fax notification will not be sent to you.
Choose Phone Terminal as the extension type.
Tick the Choose extension roles and phone numbers checkbox and click OK.
On the next screen, be sure you tick Extension is multi user aware .
Set an incoming phone number for this extension by clicking an available number from the left hand box in the Incoming Phone Number Selection section of the screen.
Tick Select extension type parameters and click OK.
Now you'll configure the extension to use as a fax extension. You'll leave all of the voice features disabled, and simply enable the fax capabilites.
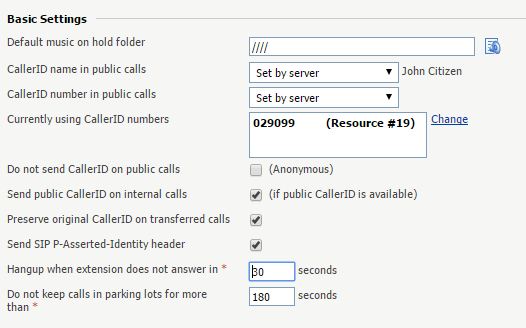
Basic Settings
The system can send the CallerID name set by server and the CallerID number set by user or vice-versa.
If you choose either the Set by equipment or the Set by user options, the Currently using CallerID numbers line will be disabled. You will not be able to select a CallerID to be associated with the extension's outgoing calls.
Option Details
Default Music on Hold Folder
This folder contains the sound files that will be played in turn whenever the caller is on hold or the extension waits for an operation to be performed.
Listen - Use the available controls to listen to the message; the total length of the sound will be displayed as well using the hh:mm:ss format.Sounds inside folder <path> - The sound files available in the chosen folder. The path will display the folder name and also its origin. "/" placed before the name of a folder signals the current account's default folder. For every "/" added, you go up an account level.
CallerID Name in Public Calls
You have three options to customise the CallerID name that will be displayed on the recipient's screen when the extension is calling public destinations:
Set by server - If it supports the CallerID function, the recipient's phone terminal will display the extension owner's Contact name.Set by equipment - If it supports the CallerID function, the recipient's phone terminal will display the caller's name as set up from the phone terminal device.Set by user - If enabled, a text box will be displayed allowing you to set the CallerID name to a custom alphanumeric value. If the CallerID function is supported, the value defined here will be displayed by the recipient's phone terminal. By default, the text box contains the extension's Contact name .
CallerID Number in Public Calls
You have three options to customise the CallerID number that will be displayed on the recipient's screen when the extension is calling public destinations:
Set by server - If it supports the CallerID function, the recipient's phone terminal will display the extension's public phone number.Set by equipment - If it supports the CallerID function, the recipient's phone terminal will display the phone number of that particular phone terminal device.Set by user - If enabled, a text box will be displayed allowing you to set the CallerID number to a custom numeric value with three or more digits.
Currently Using CallerID Numbers
Choose one or several CallerID numbers that will be sent when an outgoing call is initiated. The available numbers are the ones defined for the channel(s) (resource) used for routing the calls to public destinations.Change link and a pop-up window will be displayed allowing you to manage the CallerIDs.Public Phone Numbers section below, for more information.
Do Not Send CallerID on Public Calls
Select if you do not want your CallerID to be sent to public destinations.Anonymous string.
Send Public CallerID on Internal Calls
Enable if you want the public CallerID (when available), to be used for local and extended local calls as well.
Preserve Original CallerID on Transferred Calls
Enable this option if you want our system to keep the original CallerID when the call is forwarded between destinations.
Send SIP P-Asserted-Identity Header
When enabled, a header is added to all outgoing INVITE requests sent from this extension.sip:12340003@localhost.localdomain
Hangup When Extension Does Not Answer in <x> Seconds
Define the time interval a call is allowed to ring before being terminated by the system.
Do Not Keep Calls in Parking Lots for More than <x> Seconds
Define the time interval a call is allowed to remain in the parking lot before being transferred back to the extension that parked the call.
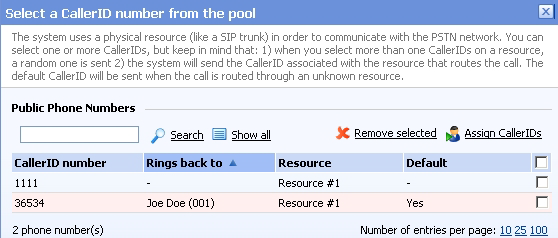
Set Public Phone Numbers
In order to be displayed in this list, the public phone number(s) defined for the channels (resources) used for routing the calls to public destinations must be assigned to the client that owns this extension.
It is possible to assign CallerIDs associated with DIDs that are on the client pool, but they cannot be already assigned to any extension.
Option Details
CallerID number
The CallerID of the DID assigned to the client that owns this extension;
Public phone numbers can be defined for a certain channel from the Channels Channel <channel_name> management Add public phone numbers to channel <channel_name> page;
Rings back to
The extension that rings the DID associated with this CallerID;
If the CallerID was not assigned to the extension, then '-' is displayed;
The public phone numbers can be assigned to the extension from the Roles and Phone Numbers for Extension <extension_name> page.
Resource The ID of the channel the public phone number was defined for.
Default
This area defines the CallerID's status.
It can be Set as default if it is associated with the extension and if it is not the default CallerID.
It can be set to Yes if the CallerID is associated with the extension and it is the default one.
It can be set to - if the CallerID has not been associated with this extension and cannot be used for outgoing calls.
A CallerID can be set as default even if it has not been assigned to the extension's DID pool!
Associate CallerID
To associate a CallerID with the extension, select the corresponding check box(es). Click the Assign CallerIDs link.
Disassociate CallerID
To disassociate a CallerID, select the corresponding check box(es). Click the Remove selected link. You will be asked to confirm the action.
Associate More Than One CallerID
Keep the following in mind:
If you have selected more than one CallerIDs for a resource (channel), then the system will send a random one to the public destination.Example: Let us assume that the outgoing calls are routed through a resource (channel), Resource #1, for which three public phone numbers have been defined and assigned to the client that owns the extension: 1123, 345876 and 2854478. If you associate all three of them with the extension, when initiating an outgoing call, the recipient's phone terminal will display, if it supports the CallerID function, one of the three numbers.
If you have selected CallerIDs for more than one resource (channel), then the system will send the CallerID of the resource that routes the call.Example: Let us assume that the outgoing calls are routed through Resource #1, for which one public number has been defined and assigned to the client who owns the extension: 2255. You associate this number with the extension and another one, 6987560, defined for Resource #2. If it supports the CallerID function, when initiating an outgoing call, the recipient's phone terminal will display 2255.
If calls are routed through a resource that does not have a public phone number assigned and you have a CallerID that belongs to another resource set as default, then the system will send the default CallerID.Example: Let us assume that the outgoing calls are routed through a resource (channel), Resource #1, for which no public phone numbers have been defined. Your default CallerID is set to 3689, which belongs to another resource (channel), Resource #2. If it supports the CallerID function, when initiating an outgoing call, the recipient's phone terminal will display 3689.
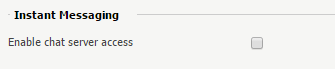
Instant Messaging
Option Details
Enable Chat Server Access
Enable if you want to grant the extension access to the Instant Messaging server.
A Jabber-based software client can be used to display desktop alerts for calls to the extension.
Calling Features
Option Details
Call Waiting Active
Calls are not rejected when the extension is busy. When enabled, this option will allow the user to answer multiple calls using the phone's call waiting features.
Do Not Disturb Function Active
When enabled, this option will have calls rejected and a custom sound file played to the callers trying to contact the extension.
Play Sound <file_name> when DND is Activated
Enable if you want a sound to be played to the callers trying to contact the extension while the Do not disturb function is enabled.
Click the icon to view the available sound files or manually fill in the file's location.
A pop-up window listing all the sounds matching the name specified in the text box will be displayed.
Listen - Use the available controls to listen to the message; the sound's total length is displayed as well using the hh:mm:ss format. If you want to download the sound on your hard drive, click the Download icon and confirm your choice.Name - The name of the sound file. Click the link to select it.Folder - This column displays the file's folder location. The path will display the folder name and also its origin. "/" placed before the name of a folder signals the current account's default folder. For every "/" added, you go up an account level.
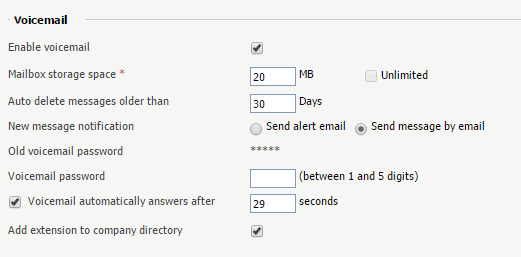
Voicemail
This feature allows callers to leave voice messages when the extension is unavailable or busy.
Option
Details
Enable Voicemail
Allows the extension to use the Voicemail function. Enabling the Voicemail recording will allow you to manage the extension's voicemails sharing by editing its Roles and phone numbers .
Mailbox Storage Space
The space limit allowed for the mailbox. Specify the number of Mb that the mailbox should not exceed. If you do not want to set a sise limit, select the Unlimited checkbox.
Auto Delete Messages Older than <x> Days
Specify after how many days all messages will be auto-deleted. Between 1 and 999.
New Message Notification
Choose the action that our system will perform when the extension receives a new voicemail message:
Send alert email - allows the extension owner to receive an email notifying them about a new voicemail message.Send message by email - allows the extension owner to receive the new voicemail message file by email.
Voicemail Password
The password requested when the mailbox is accessed over the phone. If you do not set a password for the voice mailbox, the extension owner will not be able to access their mailbox over the phone. However, the owner will still be able to manage the voice mailbox through the our system interface. By default, 9999 is set as each extension's voicemail password.
Voicemail Automatically Answers After <x> Seconds
If enabled and the extension user does not answer in <x> seconds, the call will be transferred to Voicemail.
Exit to operator on key press With a simple press on 0 , this option allows the caller to exit Voicemail and connect to an Operator, i.e. another extension available to take the call.
Add Extension to Company Directory
Add the extension to the list containing the company's extension numbers. The company directory has a functionality similar to a phone agenda and can be accessed either directly from the keypad by dialing *22 or by using a specially designed IVR action called Play company directory ;
It can be used if you want to call a certain extension, but you do not know its number; you will be asked for the name you are looking for and all the numbers matching that key combination will be played.
It is not mandatory to add the extension to the company directory. Therefore, have in mind that the extension's number will not be returned as a search result when someone is looking for it if you did not previously add it to the list.
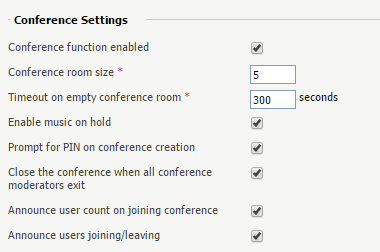
Conference Settings
This feature allows more than two extension owners to take part in the same phone conversation.
Option
Details
Conference Function Enabled Allows the extension to create and join conference calls.
Conference Room Sise Set the maximum number of users that can join the conversation;You can fill in any number between 2 and 99.
Timeout on Empty Conference Room <seconds> Seconds Set the timeout before the conference ends (in case there are no participants left);You can fill in any number between 1 and 9,999;
Enable Music on Hold Allows our system to play the files located in the Default music on hold folder if there is only one user present in the conference.
Prompt for PIN on Conference Creation The conference creator is asked to set a password; all the users that join the conference have to dial this password in order to access the conference.
Close the Conference when all Conference Moderators Exit All the calls are terminated the moment all conference moderators exit the conference.
Announce User Count on Joining Conference Any new participant is announced about the number of users present in the conference call.
Announce Users Joining/Leaving The users are announced about any participant joining or leaving the conference call.
The Conference function is strictly available for extensions with an enabled Extension is multi-user aware permission.
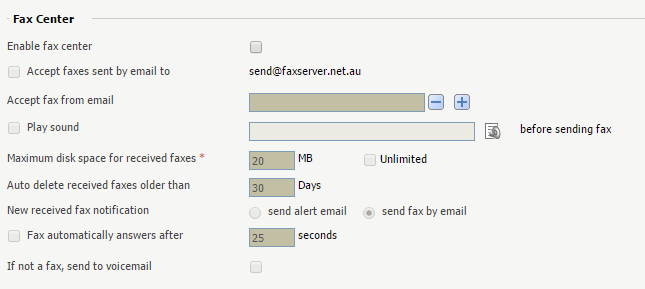
Fax Center
This feature allows the extension to receive faxes and manage them by using the extension account.
Option
Details
Enable Fax Center
Allows the extension to receive faxes. Whenever a fax message is received, our system saves it to a file on the server.
The extension user will be able to retrieve it at any point later on.
Enabling the fax center will allow you to manage the extension's fax messages sharing by editing its Roles and phone numbers .
Accept Faxes Sent by Email to
The extension will accept faxes sent to the administrator's email address, made default at installation.
Accept Fax from Email
Specify the email addresses from which the extension should accept fax messages. Use the minus/plus buttons to remove/add email addresses from the list.
This option is not enabled unless the Accept faxes sent by email to checkbox has been previously selected.
Play Sound <sound> Before Sending Fax
Choose a sound that will be played before a fax message is sent. Use the icon to view the sound files available or to manually fill in the file's location.
A pop-up window will display all the sounds matching the name specified in the text box.
Listen - Use the available controls to listen to the message. The sound's total length will be displayed as well, using the hh:mm:ss format. If you want to download the sound on your hard drive, click the Download icon and confirm your choice.
Name - The name of the sound file. Click the link to select it.
Folder - This column displays the file's folder location. The path will display the folder name and also its origin. "/" placed before the name of a folder signals the current account's default folder. For every "/" added, you go up an account level.
Maximum Disk Space for Received faxes
The space limit allowed for the storage of the received fax files. Specify the number of Mb that the fax files should not exceed;
If you do not wish to set a sise limit, select the Unlimited option.
Auto Delete Received Faxes Older than <x> Days
Specify after how many days all received faxes will be auto deleted. Between 1 and 999.
New Received Fax Notification
Choose the action that will be performed by our system when the extension receives a new fax message:
Send alert email - the extension owner receives an email notifying them about a new fax message.Send fax by email - the extension owner receives the new fax message file by email.
Fax Automatically Answers after <x> Seconds
If the extension user does not answer in <x> seconds, the server will try to answer in order to detect a fax.
If Not a Fax, Send to Voicemail
When this option is enabled, in case the call is not a fax, the server will transfer the call to the extension's voicemail; otherwise, the system will answer with a fax tone.
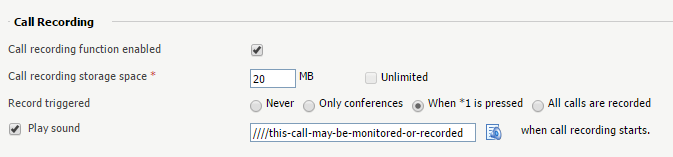
Call Recording
This feature allows the user to record phone conversations.
Option
Details
Call Recording Function Enabled
Allows the user to use the call recording functions. Enabling the call recording will allow you to manage sharing the extension's recordings by editing its Roles and phone numbers .
Call Recording Storage Space
Specify the number of Mb that the recorded calls should not exceed. If you do not want to set a sise limit, select the Unlimited option.
Record Triggered
Use the options available to specify when and how call recording will be triggered:
Never - Although the call recording feature is enabled, it is not used.Only conferences - our system will record only conference conversations; this option is available only if Conference feature is enabled.When *1 is pressed - the user will be able to start the recording of a conversation by dialing *1 on their phone pad.All calls are recorded - our system will record all the conversations of the extension.
Play Sound <sound> When Call Recording Starts
IMPORTANT: In accordance with Australian federal communications law as enforced by the ACMA, all call recordings must be preceded by a recorded message both informing the caller that the call is being recorded and giving the caller the option to opt out of the recorded call.
When enabled, our system will play the sound each time a recording operation starts. Use the icon to view the available sound files or manually fill in the file's location;
A pop-up window will display all the sounds matching the name specified in the text box.
Listen - Use the available controls to listen to the message. The sound's total length is displayed as well, using the hours : minutes : seconds format. If you want to download the sound on your hard drive, click the Download icon and confirm your choice.Name - The name of the sound file. Click the link to select it.Folder - This column displays the file's folder location. The path will display the folder name and also its origin. "/" placed before the name of a folder signals the current account's default folder. For every "/" added, you go up an account level.
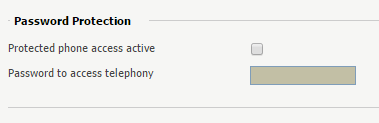
Password Protection
This feature allows the extension user to block the access to the phone terminal for a certain period of time. The terminal can be blocked or activated from its keypad by dialing the password set in this section.
A blocked phone terminal cannot be used for placing or receiving calls. If the Voicemail feature is enabled, then all incoming calls will be redirected to voicemail while the phone terminal is blocked.
Option
Details
Protected Phone Access Active
Enable the Password Protection feature for this extension. After enabling this feature and defining the required password, the following message will be displayed next to the check box: Currently access to phone is unrestricted;
Click the Block link to restrict the phone terminal usage. If access is restricted, the Currently access to phone is blocked message will be displayed.
Click the Unblock link to allow the extension user to dial/receive calls normally.
Old Access Password
This line is displayed only when editing the extension's settings and if a password has been previously defined for the Password Protection feature.
Password to Access Telephony
Specify the password the user will have to dial in order to block/activate the access to their phone terminal. The password must be a number between 3 and 12 digits in length.
If enabled and the user want to block/activate the phone terminal, from the terminal keypad they must dial *11 then the password defined in this section.
Take into Account ...
To define the behaviour of the extension for the case when the user cannot answer a call, you must take into account the following parameters:
Consider 'No answer' after <no answer> seconds Voicemail automatically answers after <voicemail answer> seconds Fax automatically answers after <fax answer> seconds If not a fax, send to voicemail
For correct behaviour, it is recommended that you comply with the following configuration:
<no answer> <voicemail answer> <fax answer>. If not a fax, send to voicemail checkbox selected.