Overview
This knowledgebase article describes how to easily create and configure an IVR (Interactive Voice Response) extension.
This example will help you understand how to define an IVR extension, how to add and edit a context, how to define actions for the menu options and finally, how to generate the IVR from the ezytel control panel.
The IVR will contain two menu options:
- 1 - to forward the user's input to an extension number from the keypad.
- 0 - to transfer to an operator.
Create an IVR Extension
The steps that have to be followed to set up a new IVR extension are:
- Log in to the ezytel control panel.
- Click the Extensions link available in the left-hand menu.
- Next, click the Add extension icon available in the Tools section.
- Provide the required information about the new extension:
- Number: 999 (for example)
- Contact Name: Example IVR
- Login: IVREXAMPLE
- Password: ivrpassword (we recommend that you use a more complex password)
- Email: contact@yourdomain.com
- Extension type: select the IVR radio button.
- Charging plans: select one of the available plans to associate it with this extension.
- You can fill in the other options as well, according to your requirements. The only mandatory fields are the ones presented above.
- Select the Choose extension roles and phone numbers check box and click OK to save data and move on to set up the extension's permissions and limitations.
- In the Roles and Phone Numbers for Extension {extension_name} page you must choose the permissions and limits to be set to the extension. In this example, we'll use the defaults and simply click OK.
- The Select extension type parameters check box must be selected in order to set up the IVR extension's behavior:
- Fill in MYIVR, or a name memorable to you, in the Name text box.
- Choose the directory containing the music on hold that will be played to the callers. All the MOH files will be cycled, so it is recommended to select more than one sound.
- Enter the default timeout period. Use this text box to limit the time interval during which an IVR caller can remain inactive while the IVR waits for input.
- If you want, you can provide a short description for the IVR extension and then click OK to save the settings.
- Now that we have successfully created our IVR extension, we must define its behavior as well.
Create a New Context for the IVR
- In the Extension Management page, click on the name of the extension you have just created, ie, Example IVR.
- Click the IVR setup icon.
- Next, click the Add context icon to set up a new context.
- Fill in a Name for the context, in our example Start (or Entry).
- Select the This is the entry context check box as we want this to be our entry context.
- Click OK to save the new context.
- Next, you will have to edit the Context Options, as described in the next section.
Edit the Start Option From Our Context
The Start (or Entry) option is automatically activated when somebody calls the IVR extension. To edit it, follow the next steps:
- Click the Start (or Entry) link to define a set of actions.
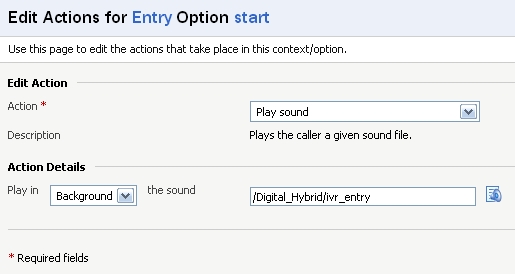
- From the Edit Actions for Start Option start page, we want to set our IVR to start by playing a welcome sound:
- Select the Play sound file option from the Action drop-down list.
- The Add in position text box should have 1 as a default value.
- Use the controls available in the Action Details section to choose one of the sound files available on your account and to set it to be played in the Background.
- Click OK to save the changes.
NOTE: If you click the Generate IVR link now, the extension will only play the sound file and disconnect after the previously defined timeout.
- We want the caller to hear 1 to reach the operator.
- Select the Play value option from the Action drop-down list.
- The IVR will play a sound file corresponding to number 1 and the caller will hear a female voice speaking.
- Click OK to save the changes.
NOTE: It is probably best to record your own sounds to define a menu.
- Select the Play sound file option from the Action drop-down list and choose the to-reach-operator sound file.
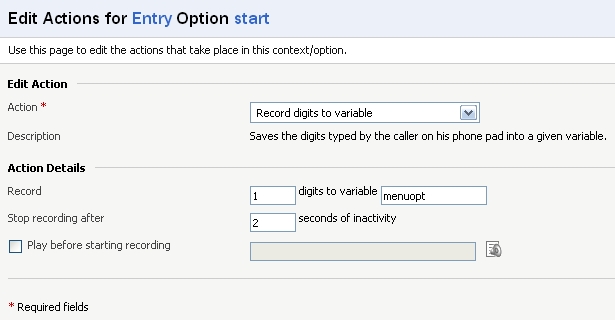
- We want to record the number entered by the callers from their phone key pad to use it later in order to jump to another option:
- Select the Record digits to variable option from the Action drop-down list.
- We will save the number entered by the callers to a variable named menuopt. The callers will have a 2-second interval to enter the number from their phone pad. Use the controls available in the Action Details section to set the values below.
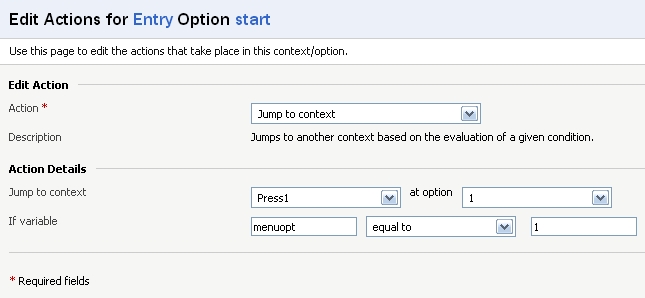
- Add rules to jump to other options: if the caller presses 1, jump to option 1 in the Start (or Entry) context; if the caller presses 0, jump to option 2 in the Start (or Entry) context.
- Select the Jump to context action. Enter the following values:
- Do the same for the second Jump to context action. Entering the relevant values.
- Select the Jump to context action. Enter the following values:
Define Actions for Option 0
- Click Up level to return to context editing.
- Click the 0 option.
- Add a pls-stay-on-line sound action as shown above.
- Add a Transfer to extension action. Use the controls available in the Action Details section to select a current extension offering support (it can be either a Phone terminal extension with one support operator or a Queue extension with several operators).
- Add an Alter CallerID with value action and enter the following data:
Prepend CallerID with value 222
NOTE: You can modify the CallerID to mark the fact that the call originated from your IVR.
Define Actions for Option 1
- Click Up level to return to context editing.
- Click the 1 option.
- Add a Record to digits variable action and enter the following data:
Record 3 digits to variable transfext
Stop recording after 4 seconds of inactivity
[x] Play before recording enter-ext-of-person
- Add a Transfer to extension from variable action and enter the following data:
Transfer to extension from variable transfext
Generate the IVR
Click the Generate IVR link available in the top menu bar. The ezytel system will compile all the contexts, options and actions you've provided, creating a fully functional IVR.

