Before taking any steps to configure your handsets, be sure you've first disabled both SIP ALG and h.323 ALG on your router, as these will cause handset behaviour problems if left enabled.
When ready, open a web browser to your handset's IP address. To find that IP address, press the Menu button on your handset, then scroll to Phone Status, and press Enter.
The handset's IP address should be appear at the top, or you can press the OK button from the main screen.
The factory default administrative username and password to access the handset's web management interface are admin and admin respectively. You should consider changing the password to secure your handset.
Now that you have your handset's IP address, navigate to it in a web browser.
To configure your handset, you'll need the following information:
- Server Address: pbx.ezytel.net.au
- SIP Port: 5060
- SIP Login: your 8-digit extension number as sent in the extension's setup email
- Password: your password as sent in the extension's setup email
- Outbound Proxy Server: proxy.ezytel.net.au
- Outbound Proxy Server Port: 5070
We advise you to ensure that your extension passwords are as strong as possible. When creating your server-side extensions, either allow our system to auto-generate them, or ensure that each password is at least 8-12 characters long and contains a mix of lowercase and uppercase letters, a minimum of one digit and one special character. Remember, toll fraud is a real threat when using VoIP over the Internet, so strong passwords will help ensure your handset remains secure.
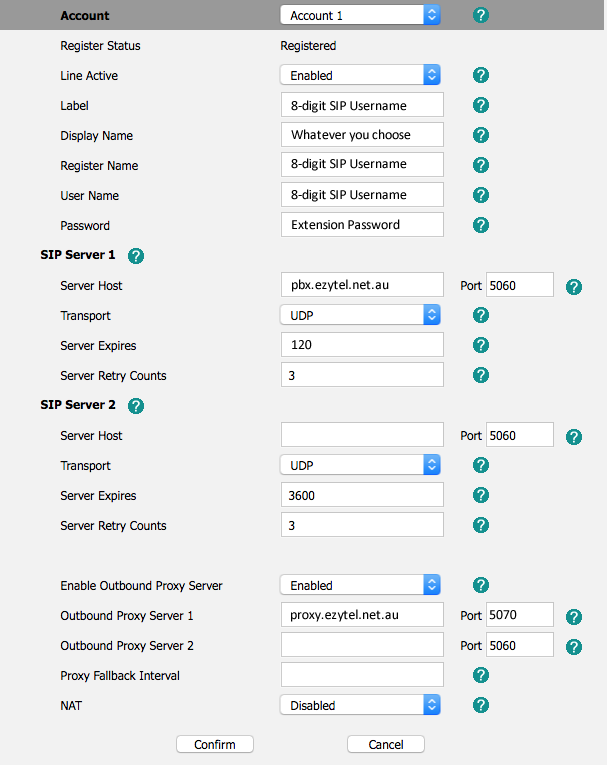
In the handset's web management interface, go to the Account tab, and enter the information you've gathered into the relevant fields as shown in the image below:
- Line Active > Enabled
- Label > Username
- Display Name > Whatever you choose
- User Name > 8-digit extension number (SIP Login)
- Register Name > 8-digit extension number (SIP Login)
- Password > your password as sent in the extension's setup email
- Server Host > pbx.ezytel.net.au
- Server Host Port > 5060
- Enable Outbound Proxy Server > Select Enable
- Outbound Proxy Server > proxy.ezytel.net.au
- Outbound Proxy Server Port > 5070

Scroll down to the bottom of the page and click on the Confirm button to save these settings.
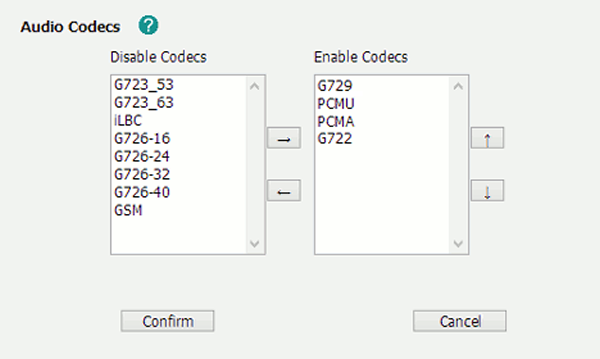
Once the page has refreshed itself, scroll down the page and click on Codecs. Verify that the following are listed in the Enable codecs section in the same order as shown in the image:
Audio:
- G729
- PCMU
- PCMA
- G722
Video:
- H264

Now click on the Network tab, then click Advanced and scroll down to the Voice QoS section. Complete the fields in the following way, being sure to save your changes:
- Voice QoS: 46
- SIP QoS: 46
These QoS settings will ensure you have no issues interacting with our service, particularly if your site is using a Telstra NBN service, which applies firewall-like restrictions on using thrid party voice providers such as ourselves.
Finally, confirm that your handset is now registered to our system by clicking on the Account tab, expand the Basic section and verify that Register Status shows as Registered.
However, because of the way Yealink handles NAT on its handsets, you may also find you'll need to manually increment the Local SIP Port on each of your handsets to resolve any one-way audio or one-way response issues you might encounter.
Go to Settings > SIP > Local SIP Port and manually increment each handset's port number by one (1).
For example, you set your first handset on extension 101 to use port 5081, then set the handset on extension 102 to use port 5082 and so on. Bear in mind that these are your internal SIP ports, so you can choose any unused port numbers on your local network and assign them as required.
This will ensure that your router knows where to send SIP signalling responses from our servers.


